We are TwoLuLa! Welcome to our journey of creative discovery!


Monday, October 7, 2013

The Making of a Tuffet

Little Miss Muffet sat on her tuffet...


Here is my very first hand made tuffet! I say "very first" not because I have others to show you, but because I want to make more. In fact the material for tuffet number 2 has been sitting in a nice pile on my piano bench (which should be a pretty good indication that not a lot of piano playing nor tuffet sewing has been happening lately).  Anyway I absolutely love how this tuffet came out!


The idea to make a tuffet came from a local quilt store, Pennington Quilt Works here in New Jersey.  They had a tuffet on display as a class sample.  It appealed to me very much but unfortunately class registration was full both times I tried to register. I put my name on the waiting list, hoping the instructor would give another class. Finally one day the phone rang...tuffet class here I come!  
'


My two college age daughters  had just gotten their first apartment.  I decided to make the tuffet for them.  Olivia came with me to select the fabric at Olde City Quilts in Burlington, NJ.  We knew we wanted to use batiks, but its such an amazing  store we made quite a time of it browsing absolutely everything.  Lots of oohs and ahhhs!  And then we wandered into the Bernina sewing machine section... we tried out the machines...there she was...I fell in love...she had been traded up for a more advanced model and was just there waiting for me.  We were the perfect match.  We took her home. 
(Now I do not usually make such expensive on the spot purchases but this was different. I was getting increasingly frustrated with the thread tangles and other problems with my existing machine and I knew I could pay her off with the money I would be earning tutoring and subbing at the high school. Believe me I had quite an internal conversation with myself before saying  "Wrap her up!")


The tuffet uses 2 inch wide fabric strips so a jelly roll was perfect. The pattern consists of 8 wedges.  Each wedge consists of 8 strips of fabric pieced onto a foundation wedge. The sewing lines are drawn onto the foundation piece before starting. After that the process was really quite straight forward and repetitive.

Foundation wedge and fabric strips ready to get started.


The first two strips were pinned right sides together on the foundation , stitched along the drawn sewing line, pressed open and the piece on the right was trimmed to 1/4 in beyond the next sewing line.


The process was repeated with the next strip (dark blue).


And with the next strip and so on, and so on, and so on...


Until the wedge was completed!


I repeated the process to create 7 more wedges.  Then came the fun part of laying them all out and playing with colors and patterns to decide on their placement in the tuffet. 


Once the layout was decided upon the wedges had to be sewn together.  This grew increasingly challenging as pieces were added because I was sewing through more and more layers of fabric.  Thank goodness for Liesel (thats what I named my new machine)! After the wedges were sewn together I zigzagged over a cord just inside the outer perimeter to gather the edges under.  Ta da!


 The tuffet class was in two parts.  At the first class the instructor showed us how to sew the strips together to make the wedges and explained how we would sew the completed wedges together at home. We brought the completed fabric cover back for the second class where we assembled the tuffet. My daughter Eva joined me for this.

Here she is glueing the upholstery foam on top of the  plywood base and covering the foam with a thick layer of batting. 


After that the tuffet cover was put on and secured to the base with staples. We added a finished fabric circle to the underside of the tuffet to cover the wood.  Finally some wooden legs were screwed on and...  A tuffet!


One of my Miss Muffets enjoying her tuffet!


Happy Creating,

Cynthia

Friday, September 20, 2013

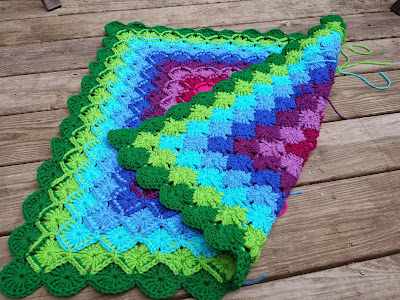
Bavarian Crochet (aka Wool Eater) Blanket


I started this child's blanket quite some time ago (see its first post here).  Somehow it got put aside and forgotten.  I have rediscovered it and am trying to make some progress.  This is my current favorite take along project when visiting Dad. It is simple and repetitive and gives me something to do when he dozes off.


The idea is a rainbow blanket. I started with pinks, then moved into  purples, blues etc.  My goal was to only use the yarn I already had and not buy anymore! I have kept to that, more or less. I think, to date, I have only purchased two new skeins of yarn.  Now that's self control!


What is fascinating is how each new round of color or color family changes the entire look of the blanket and certainly how I perceive it.  Each time that  happens I go through the process of arguing with myself about whether to add more colors or stick solely the palette I've already developed.

I absolutely loved the pink, purple and blues together. I thought that perhaps I should just scrap the rainbow idea and repeat just these color rounds several more times.

But I decided to add the greens...


Wow! I loved the addition of the greens!


I was so happy that I decided to push ahead and add the greens.  I loved this even more than just the pinks, purples and blues.  Loved it sooo much I thought I should scrap the rainbow idea and
 repeat out only the pink to green palette.  I had pretty much decided to stick to this palette until I did some color experimenting...


Hmmmm... not bad.  I texted the photo to Carol and she agreed that I should forge ahead...


Wow!  Love how the yellow looks against the greens. Maybe I should stop right there...And so the argument, and, ultimately, the crochet continued...


The yellow and golds have totally changed the look of the blanket.  I began to feel a bit queazy...Did I like it as much as before... only finishing it will tell.  So its time to transition into orange.

Next,  into the reds...

Peace,

Cynthia
 

Monday, September 16, 2013

Baby Booties


This is sweet little Averi, born this past March. Her momma is my neice Kyra.  Needless to say, Averi is everybody's pride and joy.

Krya saw a photo of crocodile stitch baby booties and asked me to make a pair for Averi. I found and purchased a great pattern at Bonita Patterns .

The instructions were  wonderful.  My progress was less so, mainly due to life getting in the way of crochet time!


This is bootie number 1.  I loved the yarn and the colors.  But  I think I used a hook that was slightly smaller than it should have been for this yarn and the entire process was full of constant snags on the decorative threads. Slow going but I persevered finished it. Alas, Averi's foot had grown faster than my hooking and the bootie was too small!  I put it away with my other unfinished crochet projects, vowing to create its mate for another baby, another day.


Here is bootie attempt number 2. I chose a different yarn and a larger hook.  Both booties were finished last night - yes Carol, I have sewn in all my loose yarn ends (Carol knows this is my very least favorite hooky thing to do).

A few quick photos and now its off to the post office to mail them to Averi.

I am keeping my fingers crossed that her feet will fit!


Peace,
Cynthia

PS: The booties were photographed against the blanket Carol's mom Muriel  made for my son's baptism in 1998.


Cynthia


Sunday, September 15, 2013

Muriel

Some recent projects. More on these in next posts.


Carol and I have been away from TwoLuLa for quite some time now. The fun of blogging disappeared as we dealt with some expected and one very unexpected turn in the road.

Expected was/is my Dad's continued battle with Alzheimer's. I can't even rightly call it a battle because this is a disease which takes away one's ability to comprehend and fight. I will write more about my Dad on another post.

Totally unexpected was the death of Carol's mother Muriel. If you haven't read it yet, please read the post before this one. Carol, very eloquently, shared her feelings about losing her mom and the long path of healing she is now on.


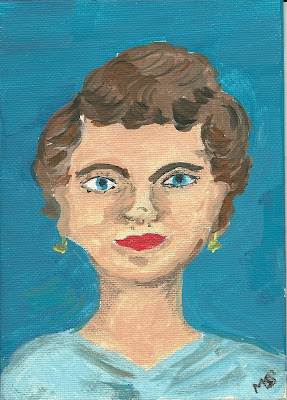
This is Muriel. It is a self portrait. Carol and I have a group of friends who get together to celebrate one another's birthdays, among other things. We each selected something special to do for our fortieth birthdays (yikes! That was a decade ago!) When my turn came I invited the gang over, gave each one a small canvas and asked them to paint a self portrait. I kept the collection of portraits (adding to it self portraits from my husband, children and dad) and made color copies of the complete set for each person. Take a look at our "About TwoLuLa" on the sidebar - those are the portraits Carol and I made (can you figure out who's who?).

I remember being sooo impressed with Muriel's painting! I knew of her talents in sewing and crochet, but I had no idea she was such a talented painter. Muriel was not just Carol's mother, but a cherished member of this group of friends. Muriel was one of the gentlest souls I have ever known. Gentle and kind, a great listener, but also absolutely straight forward with telling you what you needed to hear  (traits, my dear friend Carol, you have inherited from her) Her family meant the world to her and she was an integral part of each of their lives (husband, three daughters and five grandchildren) everyday. Everyday. I count myself as blessed that my family and I were among her adopted extended family.

Muriel's passing has left a great void in so many lives. It is difficult to watch as her family struggles with their grief. As I spend time with each of them I notice slight gestures or fleeting facial expressions, a spoken phrase or an intonation that is Muriel. It is so absolutely clear to me! I wonder if they recognize it in themselves and in each other. I wonder if it is as clear to them as it is to me that Muriel is still here with us through them.  At these times, I can't help but smile to myself and say "Hi Muriel. I'm so glad you visited me today. See you again soon."


Peace,
Cynthia

Tuesday, July 16, 2013

Five days after our last post, my mother lost her battle with two cancers.  She lived her last day as if it were like any other.  She made my Dad his favorite bread pudding and meals, watched their favorite TV shows together, chatted over tea or coffee.  My parents spent a leisurely afternoon just being together.  I received a phone call from my Dad just after midnight to come over because my Mom was really sick.  My husband and I were still up and drove a fast fifteen minutes to get to them.  I helped my mother in her final moments and never realized what was happening as it was happening.  Later at the hospital we were told that they had never been able to revive her.  The woman in my life that gave me life had lost hers. 

Now I feel a void. 

I am grateful for family and friends, friends like Cynthia (the other half of TwoLuLa) who listens when I ramble and rant, who holds my hand or hugs me when I feel lost and alone, who brings me back to life when I feel defeated.  A best friend.  I lost my greatest best friend in my mother.  I am more grateful for my other best friends now.  Always I have my sisters and my daughters, but now each of the women in my life mean so much more to me.  I treasure each one of these women because life is so precious and valuable and ends in the blink of an eye when we least expect it.  In the friendship of women I find parts of what I loved about my own mother.  I find some of what I have lost. 

Maybe God makes it that way so that we find what we lost in all of those around us that have always been here - men and women alike - but specifically that mothering sisterly bond grows stronger.  When we lose someone we love, the space left behind in our hearts for the love we received from that one special person, begins to be filled in with the love from others too.  We never fully fill up and forget, but we hurt less.  This is my hope, day by day, one day at a time, that me and my family and friends hurt less from the loss of one great lady.

Peace to you,
Carol

Tuesday, March 5, 2013

Crocheted Mittens!

Luther and I enjoying one of our many walks.

Wherever have I been? It has been sooo long since I have posted on TwoLuLa!  I can't even clearly say what has taken over my time….I guess just life in general! But more on that in my next post.

I wanted to share the mittens I just completed for my daughter Olivia.  This is my second attempt at crocheted mittens.  The first pair was for my daughter Eva. Carol was over for tea and crochet one day, many moons ago, and she was making hand warmers for her daughter Emily.  I was intrigued by them, so she taught me how to make them.  Once I got started I decided to turn them into mittens.  This was a  trial-and-error procedure for me, having never made mittens before. I will have to borrow them back from Eva to photograph.


For Oliva's mittens (done in red to match her college colors - Go Rutgers!) I decided to follow a pattern.     After some internet browsing i came upon this Basic Crocheted Mittens pattern at p2designs.com.  I altered the pattern a bit to fit the hand size I wanted and the yarn/hook I was using.


                                                           I am not sure if I finished the hand and thumb openings quite right, but Olivia seems pleased with them.  She took them back to school with her and will hopefully get some use out of them before the weather turns warm.  I regret that I only have lousy photos to share!             Cynthia


Monday, February 25, 2013

We are still here!

What happened to January and February you might ask?  I apologize for our blogging slump.  Life just gets in the way sometimes, you know?  So I was looking over at Made by K to see what she is up to and found owls.  One owl per day with a little bit about it and the statement that she has been post-less for six months.  Her thought is to take one photo.  Post it.  Say a little about it.  I thought.  GREAT IDEA!

I have an endless list of things to do to my house.  One was move the living room around to accommodate a new television viewable without the glare from the window.  And then hang artwork on the now vacant wall.  This project was waiting for my husband to decide what TV to buy (waited three years).  Miracle happened New Year's Day in the form of a sale he discovered.  I will skip the details.  Here is what I did to my blank wall needing pictures:


For now I am happy with the arrangement.  I think I will change out what is on the shelves seasonally (the snowflakes will go when spring is here).  Also, I need to paint the shelves as they are currently unfinished wood. I am not sure what color to paint them or if I should stain them.  The walls are Behr "Boston Fern" green.  I have painted black wood furniture and honey oak stained furniture in the room.  My comfy chairs are floral on a deep purple background.  I am considering painting the shelves purple.  What do you think?

Carol